Notice: Trying to access array offset on value of type int in element_children() (line 6604 of /home1/riptrack/public_html/dev/includes/common.inc).
Notice: Trying to access array offset on value of type int in element_children() (line 6604 of /home1/riptrack/public_html/dev/includes/common.inc).
Notice: Trying to access array offset on value of type int in element_children() (line 6604 of /home1/riptrack/public_html/dev/includes/common.inc).
Notice: Trying to access array offset on value of type int in element_children() (line 6604 of /home1/riptrack/public_html/dev/includes/common.inc).
Notice: Trying to access array offset on value of type int in element_children() (line 6604 of /home1/riptrack/public_html/dev/includes/common.inc).
Notice: Trying to access array offset on value of type int in element_children() (line 6604 of /home1/riptrack/public_html/dev/includes/common.inc).
Notice: Trying to access array offset on value of type int in element_children() (line 6604 of /home1/riptrack/public_html/dev/includes/common.inc).
Notice: Trying to access array offset on value of type int in element_children() (line 6604 of /home1/riptrack/public_html/dev/includes/common.inc).
Notice: Trying to access array offset on value of type int in element_children() (line 6604 of /home1/riptrack/public_html/dev/includes/common.inc).
Notice: Trying to access array offset on value of type int in element_children() (line 6604 of /home1/riptrack/public_html/dev/includes/common.inc).
Notice: Trying to access array offset on value of type int in element_children() (line 6604 of /home1/riptrack/public_html/dev/includes/common.inc).
Notice: Trying to access array offset on value of type int in element_children() (line 6604 of /home1/riptrack/public_html/dev/includes/common.inc).
Notice: Trying to access array offset on value of type int in element_children() (line 6604 of /home1/riptrack/public_html/dev/includes/common.inc).
Notice: Trying to access array offset on value of type int in element_children() (line 6604 of /home1/riptrack/public_html/dev/includes/common.inc).
Notice: Trying to access array offset on value of type int in element_children() (line 6604 of /home1/riptrack/public_html/dev/includes/common.inc).
Notice: Trying to access array offset on value of type int in element_children() (line 6604 of /home1/riptrack/public_html/dev/includes/common.inc).
Notice: Trying to access array offset on value of type int in element_children() (line 6604 of /home1/riptrack/public_html/dev/includes/common.inc).
Notice: Trying to access array offset on value of type int in element_children() (line 6604 of /home1/riptrack/public_html/dev/includes/common.inc).
Notice: Trying to access array offset on value of type int in element_children() (line 6604 of /home1/riptrack/public_html/dev/includes/common.inc).
Notice: Trying to access array offset on value of type int in element_children() (line 6604 of /home1/riptrack/public_html/dev/includes/common.inc).
Notice: Trying to access array offset on value of type int in element_children() (line 6604 of /home1/riptrack/public_html/dev/includes/common.inc).
Notice: Trying to access array offset on value of type int in element_children() (line 6604 of /home1/riptrack/public_html/dev/includes/common.inc).
Notice: Trying to access array offset on value of type int in element_children() (line 6604 of /home1/riptrack/public_html/dev/includes/common.inc).
Notice: Trying to access array offset on value of type int in element_children() (line 6604 of /home1/riptrack/public_html/dev/includes/common.inc).
Notice: Trying to access array offset on value of type int in element_children() (line 6604 of /home1/riptrack/public_html/dev/includes/common.inc).
Notice: Trying to access array offset on value of type int in element_children() (line 6604 of /home1/riptrack/public_html/dev/includes/common.inc).
Notice: Trying to access array offset on value of type int in element_children() (line 6604 of /home1/riptrack/public_html/dev/includes/common.inc).
Notice: Trying to access array offset on value of type int in element_children() (line 6604 of /home1/riptrack/public_html/dev/includes/common.inc).
Notice: Trying to access array offset on value of type int in element_children() (line 6604 of /home1/riptrack/public_html/dev/includes/common.inc).
Notice: Trying to access array offset on value of type int in element_children() (line 6604 of /home1/riptrack/public_html/dev/includes/common.inc).
Notice: Trying to access array offset on value of type int in element_children() (line 6604 of /home1/riptrack/public_html/dev/includes/common.inc).
Notice: Trying to access array offset on value of type int in element_children() (line 6604 of /home1/riptrack/public_html/dev/includes/common.inc).
Notice: Trying to access array offset on value of type int in element_children() (line 6604 of /home1/riptrack/public_html/dev/includes/common.inc).
Notice: Trying to access array offset on value of type int in element_children() (line 6604 of /home1/riptrack/public_html/dev/includes/common.inc).
Deprecated function: implode(): Passing glue string after array is deprecated. Swap the parameters in drupal_get_feeds() (line 394 of /home1/riptrack/public_html/dev/includes/common.inc).
So we're always told as model railroaders that the mainline is always at a higher elevation than the sidings. We should also be told that once someone says that something never happens on the prototype, someone else will come up with a photo to prove him wrong. The latter principle was proved again today as I found this mainline and siding pair in Madison, Wisconsin, today. The mainline, on the right in this photo, is at a slightly lower elevation than the siding, at the left. The wear pattern in the switch frog at the bottom of the image confirms which alignment is the mainline here; the shiny rails are clearly the rails on the rightmost track. The question then falls to why it is this way at this location. Well, the area to the right where the Kohl Center is now located, used to be part of the Milwaukee Road's main switch yard in Madison, so it stands to reason that the mainline bypass around the yard
If you've never ballasted track, the process can seem a bit daunting. But it really isn't that difficult after all. This video shows one quick and simple method for ballasting track. My teenage son, who has not ballasted track before we shot this video, is the demonstrator here. If he can do it, so can you.
One quick side note, this video does not deal with the problems of ballasting around switch points. That will be addressed in future posts.
Turnouts that are far from the operating aisle can sometimes require some special treatment to use manual turnout controls. If the control can be mounted in line with the throw bar, a simple push rod is all that's needed. But if the turnout is at an angle other than perpendicular, you will need to use something like a bell crank to change the push rod's direction of travel. The crank can be made very simply with a scrap piece of brass sheet like we see on this HO scale layout. For this purpose, brass is more highly recommended than thick styrene because the holes in the styrene where the push rods attach will wear out much too quickly. If you're not adept at working with brass, check at your local radio control hobby shop for commercial bell cranks.
When you're building a layout for prototypical operations, you have to make it easy for your operators to see where the trains will go as they traverse the switches in your track. This can be done on a control panel through colored lights, but what if you don't use control panels or want to keep the operators' eyes on the layout? You could install the colored lights between the rails (like we did on the Wisconsin Central project layout for Model Railroader a decade ago), but to keep things simple, why not make a marking on the ground throws? A quick dab of green paint for the "normal" mainline route and red paint for the diverging route quickly conveys the turnout position. If you use bright colors for the indicator paint, yard operators can sight down the yard ladders to quickly see which track the ladder is lined to.
Okay, so you're probably like the rest of us where we start building benchwork without a definite plan for where the track will go on the layout. Or maybe you have a track plan and want to see how it will work in something more closely approaching the model's full size. In some of the more common scales, you can use masking tape to quickly lay out your track plan and more easily locate potential trouble spots. In N scale, like this photo (from a layout tour during the 2007 Midwest Region convention in Muncie, Indiana) shows, the standard 1 inch size of masking tape is a close approximation to the width of the track; in HO, 2 inch tape will work well. Once you've got the tape down, you can even put some rolling stock on it to see how it fits and "operate" it by hand before you cut any track. You can also set out any structures that you've already built or create mockups to see how they will fit into the scene too.
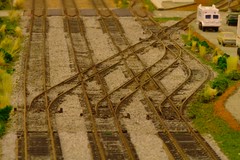
Connecting the yard tracks to the mainline tracks on a model railroad can be a confusing problem for some modelers. For this problem, like others in the hobby, it's often best to follow the KISS principle (Keep It Simple, Stupid!). This example, which was used on an HO scale modular layout, uses four standard turnouts, three small-angle crossings and one double-slip switch. With this configuration, it's fairly easy to tell which route a train will follow through the junction, and by using only standard switches and crossings on the three mainline tracks, it is much less likely to derail a train already on the mainline. One other thing to note with this configuration is that the number of S curves a train needs to negotiate to travel between the yard and the mainline are minimized, further reducing the chance of derailments through the junction.
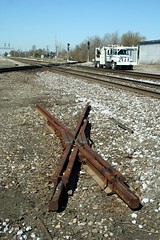
If your model railroad junk box looks anything like mine, you've got a bunch of track scraps that will never see a rail wheel on them again. Here's something that you can do with them. Rust them up and simply place them next to similar track pieces that are in use on your layout. The prototype railroads will often stage complex track pieces next to their replacement locations, like this diamond frog I found in Muncie, Indiana, when I attended the Midwest Region Convention last year. Old rails are also often left next to the tracks for a while when they are replaced, so you can use plain rail sections this way too.
When you're planning and building benchwork, be sure to leave enough clearance around your track for your largest trains to pass through unobstructed. Cut away sections of wood and place turnouts and turnout motors so they won't block your trains. Run your tallest, longest and widest trains through narrow sections until they will pass through without problems then leave a little extra room for future acquisitions. If there isn't enough clearance before you add scenery, then you'll never have enough clearance.
If you've got track passing through a closet or small room, try to minimize the number of rail joints, and thus the number of potential derailment locations, through the small room. Derailments will always happen at the most inopportune time, especially when this small room is in use.