Submitted by Slambo on Thu, 05/07/2009 - 11:07
Turnouts that are far from the operating aisle can sometimes require some special treatment to use manual turnout controls. If the control can be mounted in line with the throw bar, a simple push rod is all that's needed. But if the turnout is at an angle other than perpendicular, you will need to use something like a bell crank to change the push rod's direction of travel. The crank can be made very simply with a scrap piece of brass sheet like we see on this HO scale layout. For this purpose, brass is more highly recommended than thick styrene because the holes in the styrene where the push rods attach will wear out much too quickly. If you're not adept at working with brass, check at your local radio control hobby shop for commercial bell cranks.
Submitted by Slambo on Tue, 04/07/2009 - 10:17

When you're building a layout for prototypical operations, you have to make it easy for your operators to see where the trains will go as they traverse the switches in your track. This can be done on a control panel through colored lights, but what if you don't use control panels or want to keep the operators' eyes on the layout? You could install the colored lights between the rails (like we did on the Wisconsin Central project layout for Model Railroader a decade ago), but to keep things simple, why not make a marking on the ground throws? A quick dab of green paint for the "normal" mainline route and red paint for the diverging route quickly conveys the turnout position. If you use bright colors for the indicator paint, yard operators can sight down the yard ladders to quickly see which track the ladder is lined to.
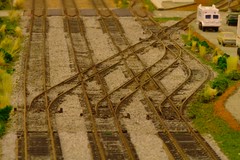
Submitted by Slambo on Tue, 06/24/2008 - 06:23
Connecting the yard tracks to the mainline tracks on a model railroad can be a confusing problem for some modelers. For this problem, like others in the hobby, it's often best to follow the KISS principle (Keep It Simple, Stupid!). This example, which was used on an HO scale modular layout, uses four standard turnouts, three small-angle crossings and one double-slip switch. With this configuration, it's fairly easy to tell which route a train will follow through the junction, and by using only standard switches and crossings on the three mainline tracks, it is much less likely to derail a train already on the mainline. One other thing to note with this configuration is that the number of S curves a train needs to negotiate to travel between the yard and the mainline are minimized, further reducing the chance of derailments through the junction.
Submitted by Slambo on Mon, 07/31/2006 - 06:37
When you're laying track, try to keep the mainline through the straight sections of your turnouts. Trains are less likely to derail on the straight sections, so the more frequent direction of travel through a turnout should be through the straight section. On this set of NTrak modules, the passing siding is between the two outer mainline tracks, while another siding veers off the blue mainline toward the backdrop.