Submitted by Slambo on Sat, 10/02/2010 - 14:58
So you've built a few structure kits and placed them on the layout. But what do you do when the structure you want on your layout isn't available commercially? Build it anyway. Often, you'll be able to find a structure kit that is almost just like the structure you want or another kit that has a wall or two that would look right. It's times like these that you throw away the instructions and build it wrong!
Download the clinic handout
Tools required
There really aren’t a lot of tools you need, and you’ve probably already got all of these tools anyway. These are the basic tools that you need for kitbashing and scratchbuilding:
Submitted by Slambo on Sun, 04/19/2009 - 06:06

Large construction projects will usually have temporary on-site offices to coordinate the work that is involved at the site. Often these offices consist of a single trailer based on a mobile home design, but for larger construction projects, larger offices may be needed. The office structure pictured here is currently up in Madison, Wisconsin, to coordinate several construction projects on the University of Wisconsin campus. The offices are made up of four 20-foot containers on the lower level and two containers that appear to be at least 48 feet long. A structure of this type would be rather simple to build in model form, especially considering the number of container models available in almost every scale. The hardest part would probably be the stairs to the upper level entry, but a quick search through your spare parts bin may reveal ready-built stair runs from another kitbashing project.
Submitted by Slambo on Mon, 03/09/2009 - 07:29

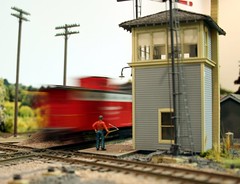
With careful planning, your layout can be built in a way that you can model several different eras by just changing a few details. For example, the scene pictured here shows a layout set in the 1930s, but it could easily be changed to show a layout set in the 1950s by simply changing the vehicles on the road. With newer vehicle models, it could also represent an even later era, perhaps the 1980s by also changing the sign on the structure and adding a stop sign at the grade crossing. If you build your layout with removable structures, you can replace Victorian architecture with Art Deco architecture to further enhance the era change.
Submitted by Slambo on Fri, 12/26/2008 - 10:20

Model railroaders are a weird bunch. We like to see cluttered structures and tons of stuff just lying around inside buildings, at least we do if the clutter and stuff is within a scale model structure. When you build a structure with open doors, you've got to add some kind of detail to the structure's interior. Think about your goals in modeling the structure and what would realistically be inside that structure. If you're modeling an empty building, there should be a "for sale/lease" sign or contractors' trucks and equipment outside to explain why the building is vacant. If the building is occupied, fill it with appropriate details, like in this scene of a small garage on a narrow gauge logging railroad.
Submitted by Slambo on Mon, 10/20/2008 - 06:41
When you build a structure with visible supports, make sure that the supports actually connect to and support something. This saloon model was entered in the model contest at the MWR convention in Waupaca last April. If you look closely at the image, you'll see that the support poles at the far right and far left on the porch don't actually support the roof over it. A mistake like this takes points off construction, which is the largest emphasis in NMRA's AP judging criteria, unless you can show documentary proof that the supports on the prototype structure also didn't actually support the roof.
Submitted by Slambo on Sat, 09/27/2008 - 06:01
Submitted by Slambo on Sun, 08/24/2008 - 12:09
Today, August 24, 2008, is the 63rd anniversary of the last regular operations of the Yosemite Valley Railroad. The railroad's last scheduled passenger train operated on August 24, 1945, from Merced to Merced Falls. If you're in need of inspiration for your next model building project, why not try one of the structures along this short line railroad? There is a fairly large amount of data to help you in your endeavors, including some in the public domain available through the National Archives. The image here is one of three images that contain plans for the Yosemite Valley Railroad's Bagby station. There is enough in the plans for any good model builder to create a reasonable model of the station. So let's get building (and if you do build this, send me a photo and you could be featured on this site too!)
Submitted by Slambo on Wed, 08/20/2008 - 05:54
I saw an ad on television recently that touted the importance of a good foundation. Just like the prototype, your model structures could be quickly and easily improved with a good foundation too. Look around at the buildings in your neighborhood; the foundations are usually visible as a narrow strip of concrete below the wall that makes up the side of a building. Sometimes the foundation is painted in the same color as the rest of the wall, sometimes it's left bare. Whatever its color, a quick box of styrene strip material will easily simulate such a foundation. If you don't add a foundation, you could end up with something like this image where the structure appears to be floating above the ground.
Submitted by Slambo on Tue, 05/06/2008 - 18:08
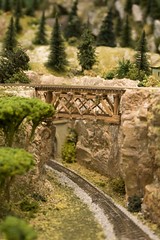
When you're working on your Master Builder: Structures certificate, don't forget that you have one bridge to build. The requirements don't say anything about the kind or the size of bridge that you have to build, only that it should be prototypical. A short bridge like this one, which is on the N scale layout of a friend of mine, would work wonderfully for this requirement.
Submitted by Slambo on Thu, 03/20/2008 - 06:37
When you build your layout's city center shopping district, break up the walls on some of the storefronts to recess the doorways. In colder climates, this was often done to provide customers with a place where they could make necessary adjustments when entering or leaving a store to account for the weather outside. The DPM kit shown here already has the doorway molded as a separate piece so adding a couple walls is a trivial matter, but don't be afraid to cut into the kits you're building to add such an alcove. Sometimes the doorways could be recessed as far as 10 feet with large sheet glass windows on the sides to give the stores some additional display space. Look around your city's shopping area and use your imagination here.
Pages